Friday, January 30, 2009

Swap-bot


You guys may already know about this website, but I'd thought I'd give a quick profile of it on my blog just in case you don't. Swap-bot is a website that allows you to create and monitor swaps, and basically takes all the hard work (finding and assigning partners, etc) out of swapping. It's a great website if you love getting things from all around the world, but you have to build your street cred within the site by successfully completing easy swaps and then progressing to bigger ones (it seems kinda like etsy's feedback system., and also a more sophisticated trade system). Although I haven't signed up yet, I think it'd be a great way to make international friends and find all kinds of neat things that you normally wouldn't be able to find without actually visiting a place. Particularly, this website has lots of potential for people who LOVE kawaii items like stationary and stickers! Give it a try, and let me know how you like it... I''m postponing signing up 'till summer when I have more time!

Wednesday, January 28, 2009

New zippered pouches!


Just a bit after Christmas I was able to make a TON of zippered pouches, mostly using uber cute fabric that I haven't yet had in my shop; I'd been hoarding a great majority of these fabrics just waiting for a bit of time to make them into something and Christmas vacation was perfect! I've made about 50 pouches, give or take a few; it took me the better half of 3 days to cut, interface, sew, trim, turn and make zipper pulls for these pouches, but I think it was well worth it! Isn't the picture funny? The ruler is for drama! My favorites are some of the ones made out of lecien caramel town fabric... so cute! They'll trickle into my store slowly, probably throughout the semester! Off to work on a new amigurumi now (hint: she's going to come with cookies!)

Thursday, January 22, 2009

Valentine's Day amigurumi!


I got a head start on Valentine's Day this year (I made a bunch of stuff over Christmas) and a good thing... I'm getting pretty busy! This year's offerings include luv luv bearlets, red velvet cupcakes (a new one with pink frosting), and lovebirds (new color: cream with pink heart wings). In the shop soon; some by the weekend! Love, Holly

Monday, January 19, 2009

Flooding!


Look what happened to my room! A pipe was leaking in our shower and it went under the tile and into the carpet of our hallway and my room; we had to take up all the carpet and move all our stuff. What a bummer! On the bright side, we had a 4 day weekend here in Hawai`i because Monday is Martin Luther King Day (a federal government holiday) and on Friday we were supposed to have 60 mph winds and hurricane weather, so school was canceled and all non-essential government workers had the day off. As it turns out, the weather wasn't that bad at all, but it was still awesome to not have school!

Saturday, January 17, 2009

Recycled tiny re-ment booklet tutorial


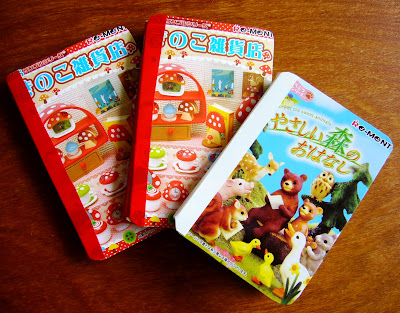
It must be fairly obvious that I LOVE re-ment (those kawaii tiny Japanese miniatures) and I have to admit that I have a lot of them. But I also have a lot of leftover boxes, and they are just too just darn cute to just throw away. SOOOOO, besides cutting them up to make stickers, I thought they'd make excellent book covers, and I've put together a little tutorial that utilizes and recycles these boxes and leftover paper and makes something really cute for not a lot of $$$. You can basically use any thin, non corrugated cardboard box (like a shoe box or a cereal box) but re-ment boxes are awesome because they are so nicely designed. You can also use any old paper you have lying around (like from a used school book, or scratch paper...). Although my tutorial is kinda simple, there are also really awesome, high-tech and professional tutorials on book binding on the Instructables website. But, since you are already here, and without further ado, here my tutorial for a recycled tiny re-ment booklet:


Materials: Hopefully you can find most of this stuff in your house; the only thing I had to buy was the electrical tape (which is awesome because you can place it again and again and it comes in pretty colors).
  • cardboard cut to size (I used the front and back panels of the re-ment boxes, so that limited the size of my books)
  • paper (recycled from school notebooks: graph paper is awesome because the lines help guide you... I would highly recommend a paper cutter if you have one... so easy!)
  • dental floss
  • upholstery, tapestry or yarn needle (basically a big honkin' needle; I think I actually used an embroidery needle)
  • scissors
  • electrical tape (it comes in many sizes, get one that is at least 3/8" or ~2 cm; you could probably use masking tape as well, though I don't know how easy that will be or how good it will look)
  • awl (I've read that a compass or heavy needle will also work, but the awl made it so easy)
  1. First, cut your paper. To get the right size, use the piece of cardboard you are going to use as the cover as a guide; just double the width of the cardboard piece and cut out your papers approximately to that size (you will be folding these papers down the middle to form the pages of your book). However, you will want to make sure it the paper is smaller than the cardboard you want to use by at most 1/4" or ~ 10 mm. This will ensure that once you bind your book, its paper won't be sticking out way past the cover. Organize the paper into little booklets ( I forget the proper term) of approximately 7-10 pieces (folded in half, it will give you 14-20 pages). You can make as many of these booklets as you want, though I think a good number to stay between is 3-7.
  2. Use an awl to punch holes in your booklets, maintaining the same number and placement of holes in each booklet. In the end, you'll want them to line up with each other so that your papers are held neat and tidy.
  3. String a long length of dental floss onto the needle (I used my spread arms as a guide) and use a ladder stitch to sew the pages together. (So, you sew down one side of the book which leaves every other stitch empty or without thread. Once you get to the bottom, you just sew back up the way you cam, which fills the empty stitches with floss... hopefully the picture helps!)
  4. Knot it at the end and repeat for all remaining booklets.
  5. Once that is done, it's time for binding! Mind you, mine is waaaay unprofessional, but hopefully easy! Get a short length of electrical tape and place it around all of your booklets... the neater you are here the better! Try to keep the tape and booklets straight... it helps to put the booklets on a flat surface so they stay even while you are binding them.
  6. To ensure the booklets don't fall out individually, open the book to the place where each booklet ends and begins, and place another length of tape down the middle of the two booklets, joining them together. Do this for all the booklets. Again, neatness is key!
  7. This is what it should look like when you are finished with that part:
  8. Place the covers on your now bound booklets and use the tape to bind the two covers and the booklet book together. Make sense? No? Maybe the picture will help. Don't forget to be tidy!
  9. Also, don't forget to bind the booklets to the cover on the inside with more tape at the joining of the cover and booklet!
  10. Ta-Da! Your little booklet should be done; it should be flexible and no pages or booklets should fall out.... ever. Now you can use it for fun! (hint; I rounded the corners so it looks more professional... Yay!)

Wednesday, January 14, 2009

banned from movie watching


We got Netflix for Christmas and since then we've been catching up on all the movies we haven't been seeing in movie theaters because they are so expensive!  There's so many good things about watching movies at home; you can eat spaghetti while you watch them, you can pause to go to the bathroom, and you can lie on the floor with a pillow and blanket.    Plus, I get the most enjoyment out of movies when I can make mad comments on them... like during the entire movie!  I think this fact makes me a notoriously bad movie watcher. Most times I like interjecting my own dialogue (sometimes I do it in other languages, or using funny voices; more often than not I incorporate obscene material where there really shouldn't be any).  Or I'll ask complicated theoretical questions about the characters and the situations they are facing onscreen, and most times the people I love donÊ»t mind (in fact they usually have some hearty laughs because of my comedic timing and genius).  However, it must get to be too much, because sometimes I am sometimes banned from movies.  My most recent movie ban has been from "Chronicles of Narnia: Prince Caspian."  I am not allowed to watch that movie with anyone, and if I do, I must take a vow of silence for the ENTIRE movie.  I think my family was biased though, both my sisters love the Lion, Witch and Wardrobe series, and I've never read them.  So they were a bit touchy I think, and banned me not even half-way through the movie (I think it was when I called "King Henry the Majestic" a "wanker" and Prince Caspian a "toolbag").  But honestly, I wasn't that bad; I tried to restrain myself!  Plus, its just embarrassing.  I mean, how many other 24 year olds do you know who are banned from a PG movie?

Monday, January 12, 2009

No more teddy bear picnics!


I am sitting here in the dark, eating a rice krispy treat and packing up some orders; it is 11:50 pm. I don't wanna go to school! Boo!

I realized today that I wasn't as productive as I thought I'd be this Christmas vacation; My bear explosion wasn't really a huge explosion, more like little firecrackers. I actually have a ton of bears, many more needle felted ones now, but none of them are photographed. Oh well, to be continued in the coming months; I also have some economical bear lollipops coming for Valentine's Day. I didn't get to work on many new designs yet (but you can definitely expect a cow before Chinese New Year's... January 26) but I will get started on some as soon as I settle into the 'ol school routine.

I realized something else, and I'd thought I'd share it with you guys just in case it makes a difference in your sales; My last 10 sales (approximately) were all to lovely people who live outside of the US. When I list in the morning, my views are way down. But when I list late at night, my views are REALLY high. Hope it helps!

Just in case I don't get the chance because I get busy (I actually just got a ton of custom orders... right before I was going to close it... uncanny!) Have a happy January week!

Friday, January 9, 2009

Chinatown


Went to Chinatown so I could enjoy my last few days of freedom ( I start school again on Monday, boo!). Although I'll be finally writing my thesis this semester, I think it'll be a good semester; the professor I TA for is awesome... not crazy like the one I TA'd for last semester. I also don't have as many classes (since I'm supposed to be writing). Still, I'm going to miss going to bed at 2:00 and waking up at 10:30! Anyway, thought y'all might like seeing some pictures of weird fruits and stuff they have in Chinatown:


Chinese dimsum shaped like carrots and various other delectables (sorry for the glare!)

Waterplant for fresh water ponds... only $1 each!


Sugarcane stalks... they can be cut up and sucked on... like a natural sugar lollipop!


Daikon, turnips, eggplant, potatoes and taro


Fresh fish!
Assorted beans, scallions, onions, and peppers

Rambutan


Bunches of dragonfruit (pink), long-on (green) and mangosteen (mangosteens are sooo cute.. they're the dark purple ones!)Fresh gingers and bird of paradise flowers

Wednesday, January 7, 2009

MySoti and Ponoko

I found these really great websites for customization through flickr (and also a very lovely person told me about one of them... she'd thought I'd like it and she was right!). Anyway, you guys may know I'm a big fan about making your own designs and having them professionally made into products;on many of these sites you can set up your designs and actually receive commission on sales... without really having to do anything! I've mentioned cafepress, zazzle and spoonflower on my blog before, though spoonflower is the only one I've actually tried (and been very happy with!).

Now it's time to learn about ponoko and mysoti!

Ponoko is a site that allows you to make just about anything... using later cutting on acrylic sheets, wood and metal and much more! There are limitless possibilities; furniture, jewelry and even *lighting* are but a few of the items I saw during my visit.
This site also allows you to request items be made for you, or you can make whatever you want yourself! There is a shop feature where designers can sell their actual wares or kits to make stuff. You can use the design packages on the site to help you determine how large your designs will be, and there's a forum and lots of help available on the blog. Although they are a bit expensive (the labor and packaging fees are quite high), I don't know of anyone else who allows regular people like me design and produce items with this variety of materials. I can see myself making acrylic zipper pulls and keychains, metal and wood components for jewelry and much more! So cool!
berrysprite leafy guy tee by berrysprite. Available from MySoti.com.
MySoti is a website that lets you upload graphics in .png or .svg files to create T-shirts; they have a shop/commission feature as well. Although their base prices for T-shirts are high (like $16) they also allow an regular people to produce their own designs. I haven't ordered from them but it looks promising; they carry different types of shirts (including American Apparel) for men, women and kids, and onesies and can also print your art on a canvas. I'm thinking about putting this little guy on some fabric... we'll see! Enjoy!

Monday, January 5, 2009

London Cat and a Free Desktop Calendar!


Yay! It took me a while to photoshop this baby into a calendar, and its a little late for the start of January, but I made it just for you! It's not too late, right? Tada! A shiny new Desktop Calender for January 2009 featuring my special little guy for the month: London Cat! He will make his debut on my blog tonight, and there will be more photos of him on my flickr and he will be available in my shop shortly. If you click on London Cat's photo in the corner, you'll be linked to a photobucket album I created with three different photo sizes so you can download them as desktop calendar backgrounds; there's even a widescreen one! All you do is click on the photo is photobucket, make it full size and "save as" the picture to your desktop. From there, you can make it your desktop background (if that is your desire!). Or you can also go to my flickr (if you so prefer! I think the resolution may be a little lacking, but it's still cute!


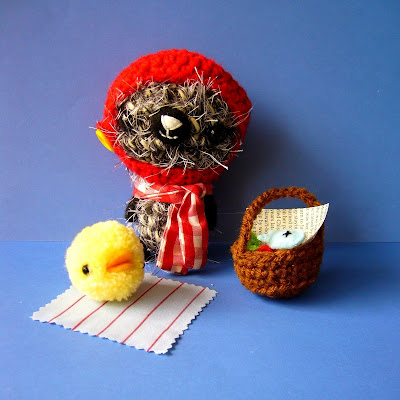
Anyway, here are some more pictures of London Cat because he's so gosh darn cute: He'll come with a red helmet style hat with a yellow button, a red gingham scarf, a yellow chicken friend, a blue and red striped tablecloth, an open picnic basket (which conveniently fits his chicken friend), a fish and 3 chips all wrapped in a newspaper, and an apple!

Thursday, January 1, 2009

Happy New Year: New bearlets for the bearlet explosion!


Happy New Year everyone... hope you had a safe and happy holiday! As you may have seen, starting today (Jan. 1st) my etsy shop will feature the hard work of months and months! I'm premiering my new bearlet collection (which I referred to as bearlet explosion on my shop homepage) which will include my very hyped amigurumi bearlets with felted limbs. They're so cute! I only have these six ready right now, and I'm not sure how I'll be listing them yet, but definitely these six will be listed by the end of January... aren't they so fun? I got a chance to photograph them at the Botanical garden and while the photos are cute, the actual little guys are even cuter!


Anyway, I'm trying to be more organized this year (I think that might be one of my resolutions... sounds good, huh?) One of the ways I'll be doing this will be uploading my pictures to flickr in collections and sets, so expect a January 2009 collection there soon. That way it'll be easier to find new designs, and I do have a bunch planned for this year (giraffe, cow, etc!).

Also, each month I want to have features. Among these will be a special monthly amigurumi set which will come with specially made goodies which will be limited editions; I won't recreate them exactly the same (they may be in different colors or have different accessories). These special features will also always have FREE SHIPPING, anywhere in the world. And because you guys know how long it takes me to get my act together (and because I've been quite busy hanging out with family and friends), I can only tell you about this month's feature, because he's not ready just yet!
Special amigurumi feature set- LONDON CAT!
Other special themes for this month:
  • general- bearlet explosion
  • shape- sphere
  • accessory- winter wear (scarves, caps)
  • color- minty green/blue
Related Posts Plugin for WordPress, Blogger...